1. User Guide Introduction
ExoResume is an easy-to-use resume builder, which will help user to create an outstanding resume, cover letter, reference letter and portfolio with ease in no time. It comes with many features which commonly included on modern resume maker application and with a powerful document editor, which user can easily edit existing templates with the drag-and-drop feature to make them their own, and also be creative in creating new document designs.
2. Getting Started
How to Get Started Using ExoResume App?
This section will briefly explain how to start accessing ExoResume App, beginning with the registration process to gain access to the user-specific page, document editor, and other key features, followed by the email verification step which is necessary to activate the user account, allowing access to the App through the login page. This section also outlines the steps required to reset your password if you forget the password registered with this App. The next section will describe the steps to subscribe to a Pro Plan, which is necessary to access all the features that are not available in the Free Plan.
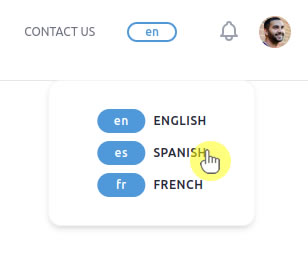
Before proceeding with the above steps, it’s advisable to adjust the language of this App to one you are comfortable with. Currently,
this App supports three languages: English as the default language, along with Spanish and French.
You can also explore the App's introduction on the home page and view the available templates you can choose from,
as well as watch the introductory video to quickly familiarize yourself with the App's main features.
2.1. Registration
How to register?
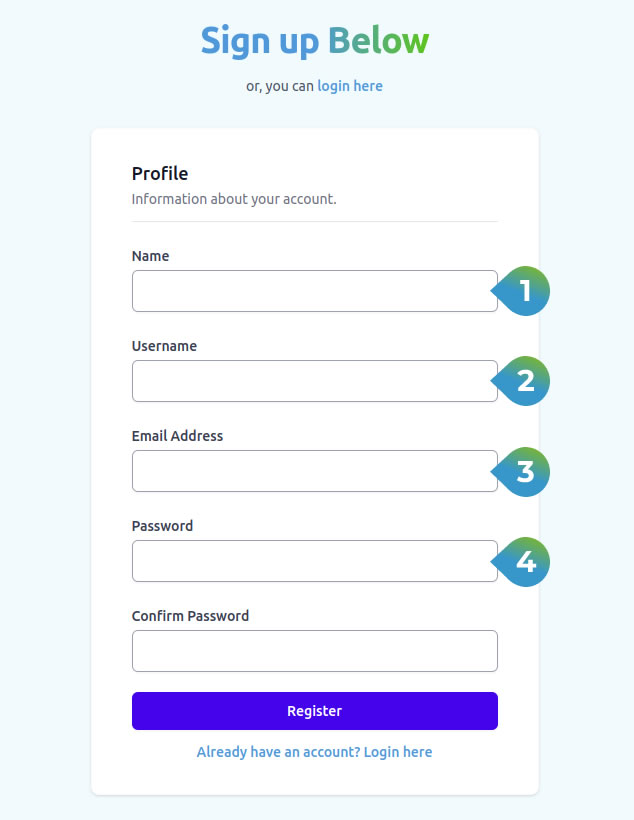
User register to this App by clicking the 'sign up' button in the top right corner, the App will display the registration form.
Please enter the requested information carefully before pressing the 'Register' button to submit your registration information.
Follow the steps below to register:
- 1 Enter the desired name in the 'Name' field and
- 2 Input username you want consisting of letters, numbers, and special characters, without using spaces.
- 3 Enter your valid and accessible email address, as the App will send a verification code to the registered email address, and then
- 4 Fill your password in the 'password' and 'confirm password' fields. Save your password, you will need it to access your account after it is verified.
After the information is sent, if the same username is found to have been used by another user or the email address entered has been registered in the App,
you will be asked to enter or replace the username or email address with a new one.
If no problems are found in this registration process, a verification email will be sent to the email address according to the one you entered above.
2.2. Email Verification
Follow the steps below to verify your email address:
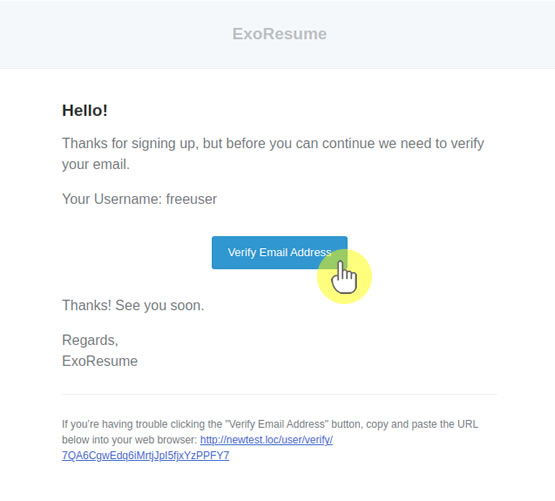
After you register, users need to verify their email by clicking on the link sent by the App to the registered email address.
Pay attention to the username information in the received email, as the App may ask you to enter either your username or email address when logging in.
Click the Verify Email Address button to verify your email address.
If you are having trouble clicking the Verify Email Address button, copy and paste the URL at the bottom of the email into your web browser.
Once your email is verified, users will be automatically registered as 'Free Users' and can access the App by logging in on this login page.
2.3. Login
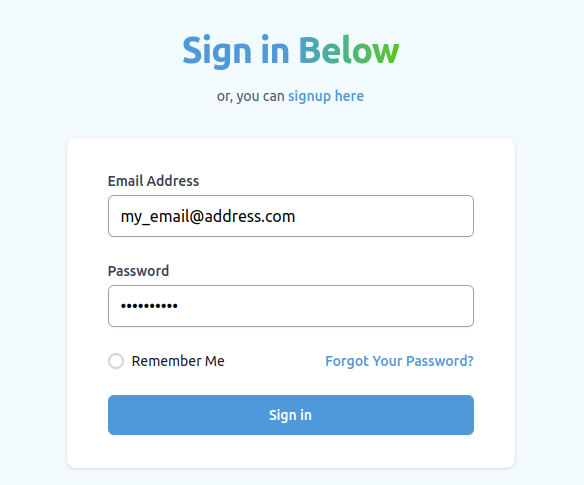
How to login?
Registered User login to the App through the login page (as shown in the image on the left) via the login button in the upper left corner of the App or other buttons on the homepage, in order to use the main features of the App.
Enter the email address and password you registered and click the Sign In button.
If you forget the registered password, click the Forgot Your Password? text at the bottom right of the Login form, and a 'Reset Password' form will appear that you can use to reset your password and replace it with a new one.
If you forget the registered email address, repeat the registration process using a new email address.
If you are accessing for the first time or have not subscribed to any pro plan, you will log in as a free user.
2.4. Password Reset
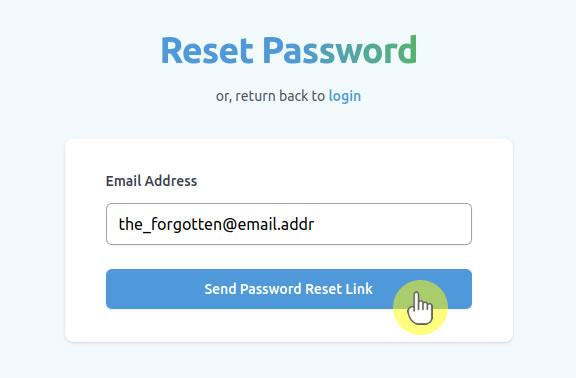
What should you do if you forget your password?
The form shown on the left is the form you can use to reset your password if you forget the password registered in the app.
Enter the registered email address in the 'Email Address' field and click the Send Password Reset Link button.
If the email you entered is registered and verified, the App will send an email to that address containing instructions to reset your password along with a link to do so.
If the email is not registered, you will be alerted to input a correct one.
If you are having trouble clicking the reset link, copy and paste the URL at the bottom of the email into your web browser to reset your old password.
2.5. Subscription Plans

Free User Plan
As introduced above, upon registration and verification, new users will automatically be registered as Free User.
With a Free User account, users has been able to access almost all available features. They can access the Account Settings feature to edit profile data,
add a profile picture, change their password, and select a default language that will automatically be active the next time they log in.
Users with a Free User account can also able the User Dashboard to view a summary of their subscription status, document summary, and payment history (if any),
and can access details of each feature through the view button. From the User Dashboard,
users can also start creating new documents (limited to free resume templates) and subscribe to a Pro Plan.
Users with a Free User account can also access the Document Editor to create new documents (limited to free resume templates only)
or edit documents that have been created, and print or download them.
These following features are not accessible using a Free User account:
- All premium templates
- Multi-page feature
- Cover Letter Template
- Reference Letter Template
- Portfolio Template
- Pie Chart Feature
- Map Editor
- QR Code Editor
- Quick Fact feature
- Document URL Sharing / Public View
Note Free Users can access the above features through Demo Templates.
This template is only intended to provide users with a quick access to all the ExoResume Premium Features.
All changes made on this template can be saved but CANNOT BE PRINTED OR DOWNLOADED.
Pro User Plan
To access all the features provided in this App, users must subscribe to one of the Pro Plans. The following are the steps to subscribe to one of the available Pro Plans.
- 1 You can go to the Subscription Plan page by clicking the Plans button on the Dashboard menu, or via Extend/Switch Plan on the User Dashboard. On the Subscription Plans page, the plan you are currently subscribed is marked with a green badge.
- 2 Choose the desired Pro Plan, then click the Switch Plan or Extend Plan button at the bottom of your selected Pro Plan.
- 3 The Order Summary page will open. Review the details of the Pro Plan you've selected: the subscription duration and your current subscription status.
- 4 If all the details of the plan you selected are correct, review the available payment methods in the right panel and click the payment method you prefer.
- 5 You will be redirected to the selected Payment Gateway page. Complete the payment process according to the Payment Gateway's instructions.
- 6 After the payment process is complete on the Payment Gateway, you will be directed to a Payment Notification page reflecting the payment status (failed/success).
2.6. Templates
ExoResume Professional Templates:
This page presents the range of templates available, categorized into free and premium options. It highlights several unique templates that cater to various professional needs, including one-page and multi-page designs. Additionally, it emphasizes customization features, allowing users to modify templates according to their preferences.
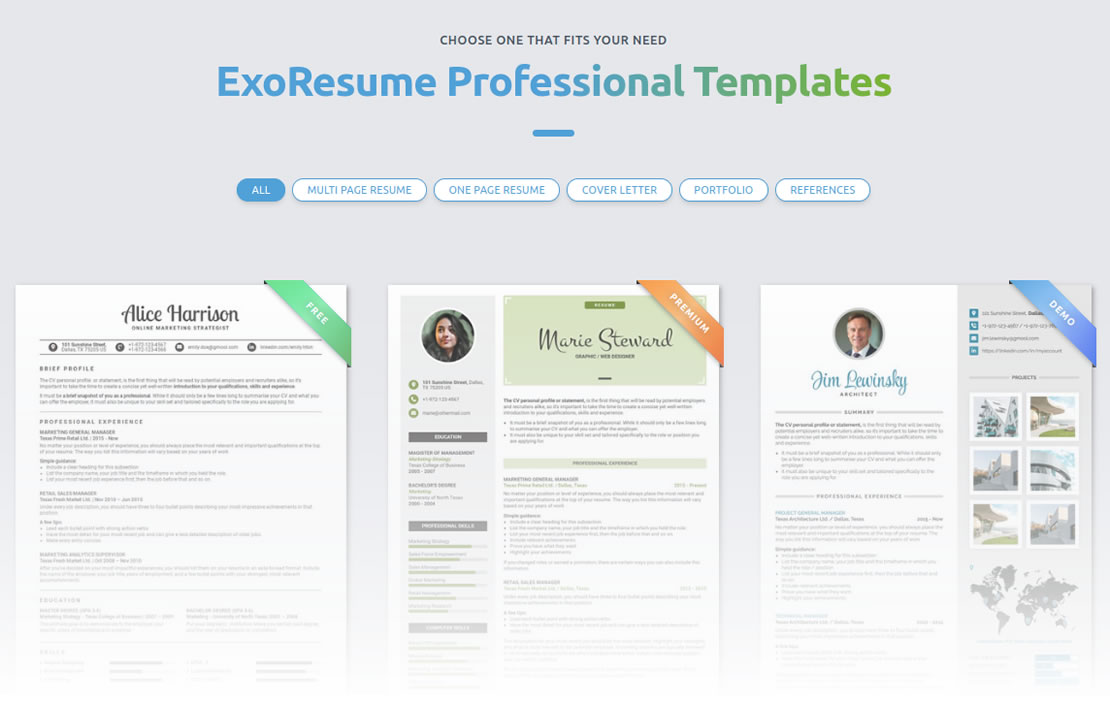
The free templates include straightforward one-page designs with limited features available, suitable for various professions.
Premium templates provide more extensive options, featuring multi-page designs for not only resumes templates,
but also templates for cover letter, reference letter and portfolio with more professional features available.
Users can customize templates, enabling the creation of unique resumes that reflect personal branding.
Specific templates, such as the infographic template format, include specialized features like Quick-Facts and many other professional features for enhanced presentation.
Demo templates are available for users to explore premium features before subscribe to a Pro Plan.
All templates support multiple color themes, allowing users to choose styles that best fit their aesthetic preferences.
3. User Page
3.1. User Dashboard
Your Account Details, Active Plan, Document Summary and Payment History:
User Dashboard serves as the central hub for information and activity within this Apps for Registered Users.
On the User Dashboard, users can: 1 View a summary of their subscription status, such as the currently active Subscription Plan,
the Subscription Plan's expiration date, and the number of days remaining until the current Plan expires.
2 This User Dashboard also allows users to see the number of documents they have created and the maximum number of documents they are allowed to create,
along with the number of documents for each document type (Free, Premium, and Demo).
Other information accessible on the User Dashboard includes 3 History of subscription plan payments made,
and access to the details of each transaction via a view button.
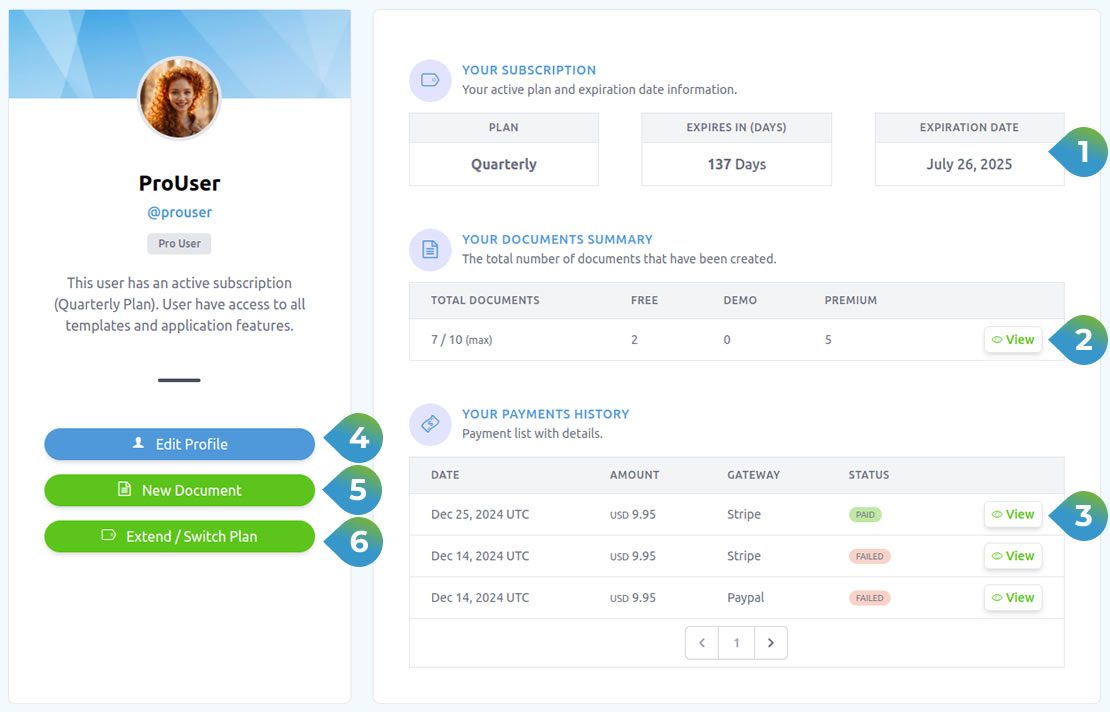
In addition to accessing summaries of key user information, users can also initiate almost all key activities within the App from the User Dashboard, for example, accessing 4 the Account Settings feature to edit profile data, add a profile picture, change the password, and select a default language, via the Edit Profile button on the left panel of the User Dashboard. In the left panel of the Dashboard, users will also find 5 New Document button that will direct them to the new document creation stage, and 6 Extend / Switch Plan button that will take them to the plan subscription page to extend their subscription or subscribe to other plan options.
3.2. Documents Summary
Follow the steps below to setup your site template:
On the Document Summary page, users can view all documents that have been created, including the document number, name, and category. The template type (Free, Premium, and Demo) can be identified by the color of the badge in front of the document name: Green represents Free Template, Blue represents Demo Template, and Red represents Premium Template.
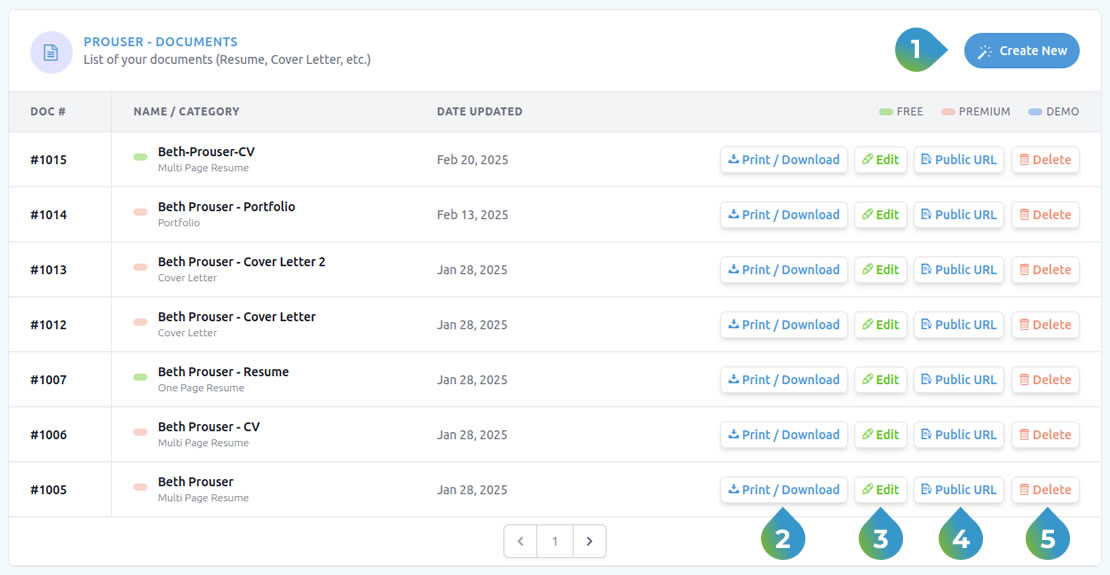
In the upper right corner, users will find the 1 Create New button, which will direct them to the document creation process. In the right section of the table, there are several action buttons. The first is the 2 Print / Download button, which will direct users to a page to print the document or download it in PDF format. Next is the 3 Edit button, which will open the Document Editor, allowing users to edit previously created documents. Clicking the 4 Public URL button will open a new browser tab displaying the selected document along with its URL, which can be shared with the public. This allows the public to access the document via the URL without needing access to the App. Finally, the 5 Delete button allows users to remove documents from the list of created documents.
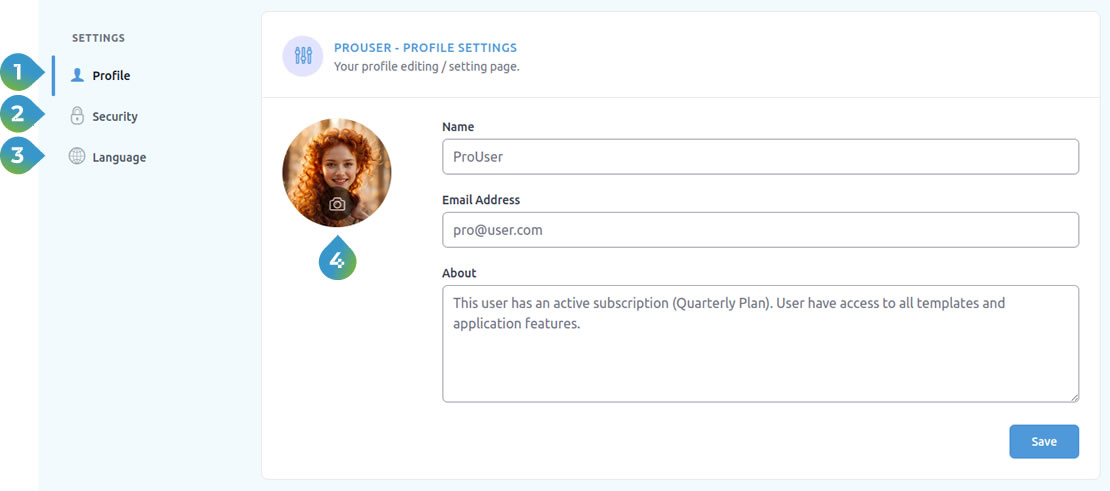
3.3. Account Settings
Profile, Security and Language Settings
This page can be accessed via the top menu by selecting Dashboard > Settings or through the Edit Profile button on the User Dashboard page. On this page, users can select the 1 Profile sub-menu to configure profile settings, including editing the User Name, Email Address, and additional information in the About section. In this sub-menu, users can also add or change their profile photo using the 4 Profile Photo Editor (zoom, crop, rotate, etc.). 2 Users can update or change their password by selecting the Security sub-menu. And through the 3 Language sub-menu, users can select their preferred language to use within the App, which will automatically be activated upon the next login.
4. Document Editor
4.1. Quick Start Tutorial
The main feature of this app is the Document Editor, which is used by users to create or edit documents, such as Resumes, Cover Letters, Reference Letters and Portfolios based on available templates.
ExoResume Document Editor is easy to use. Just select a template you like, then choose your preferred theme/color and set the resume size (A4/US Letter),
fill in your information by simply typing it or by copying and pasting information from your old documents, then set the features used through the available editing tools and finally print or download your new created document.
But if you want to re-design the layout to make it yours, you can easily control every elements on the template.
Please watch this video to get to know the basics usage of the Document Editor:
4.2. Editing Tools
Each element and feature in the document created has its own editing tools which are located in the editing tools on the left panel.
Some editing tools will only appear in the panel whenever the element or feature to be edited is selected.
For example, the QR Code editor will appear in the editing tools panel whenever the user selects a QR Code to be edited/adjusted
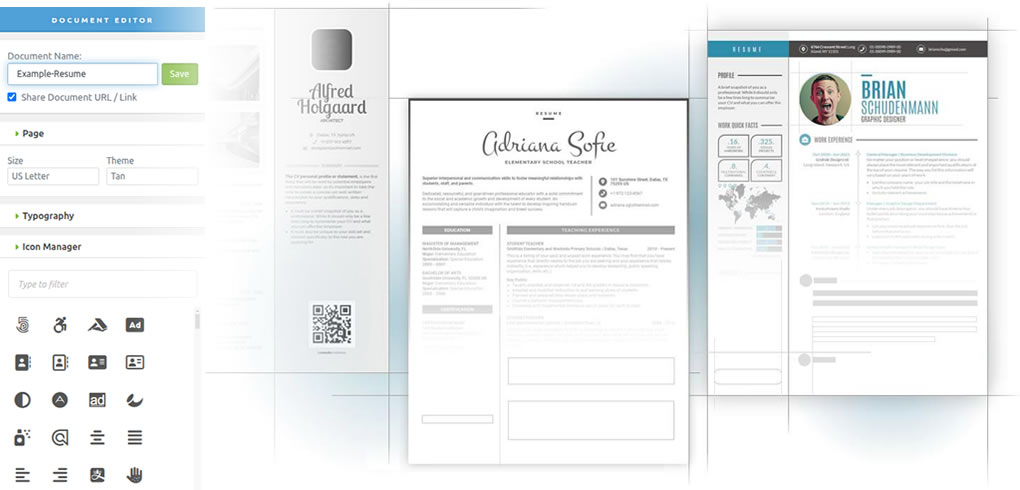
4.2.1. Page Options
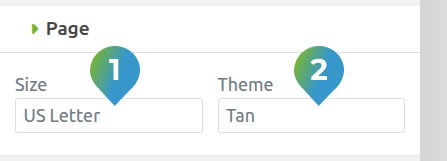
The first step that is recommended to be taken after naming the document to be created is to determine the page size of the document by selecting the page size you want in the 1 'Size' drop-down list and the theme/color of the document by selecting the page color/theme in the 2 'Theme' drop-down list.
1 In this App you can choose A4 Page Size (210 millimeters by 297 millimeters or 8.3 inches by 11.7 inches) or
US Letter Page Size (215.9 millimeters by 279.4 millimeters or 8.5 inches by 11 inches) for the document you create.
2 Page themes can simply be differences in main colors and accent colors, or they can be differences in elements or layout of the page.
Tutorial Video:
4.2.2. Icon Manager
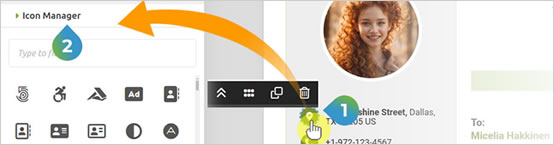
Every time you select (click on) an 1 icon element on the document page, the 2 icon manager section will appear in the tools panel on the left. There are more than a thousand icons that you can choose to replace the selected icon, you can enter keywords to filter the icons you want to display to make it easier to find the icon that suits your needs. Last step, click on the 3 New Icon you want and the icon will appear to replace the old icon.
Tutorial Video:
4.2.3. Bar / Pie Chart Editor
The skill chart feature (bar chart/pie chart) is a feature that can be used by users to show data levels in graphical format. In this feature, users can set the data level display in percent, set the bar/pie chart tickness and edit the data name text.
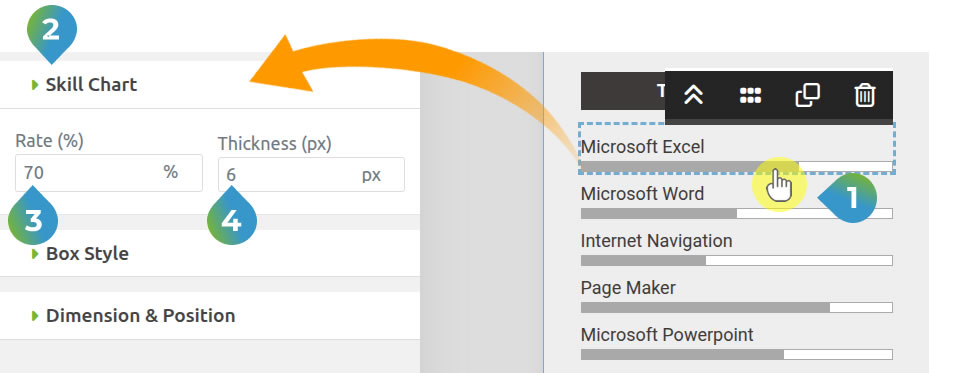
By clicking on a 1 skill chart element, the 2 skill chart editor will appear in the editing tools panel.
The user can set the data rate by entering the desired rate value in the 3 'rate(%)' column, from 0% to 100%.
To set the thickness of the chart, User can select the desired value in the 4 'thickness (px)' drop-down list, with a range of values from 2px to 20px.
To adjust the name/description of this chart element, double-click on the text to be changed and type the new name/description you want, the same way as when editing other text elements.
Tutorial Video:
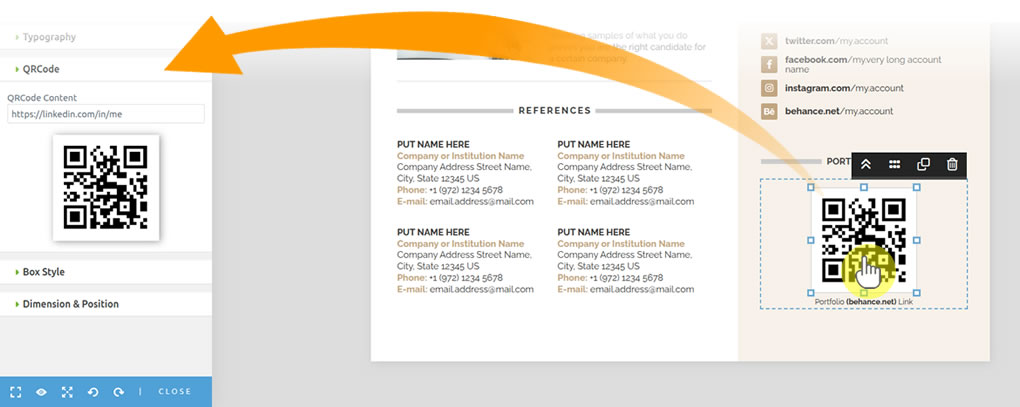
4.2.4. QR Code Editor
To edit the QR Code element, just click the 1 QR Code element to be edited, the 2 QR Code editor will appear on the left panel, enter the content you want to display on the QR Code in the 3 'QRCode Content' column and click the tab button to finish, the QR Code on the editor panel and the QR Code on the document will change according to the content you entered.
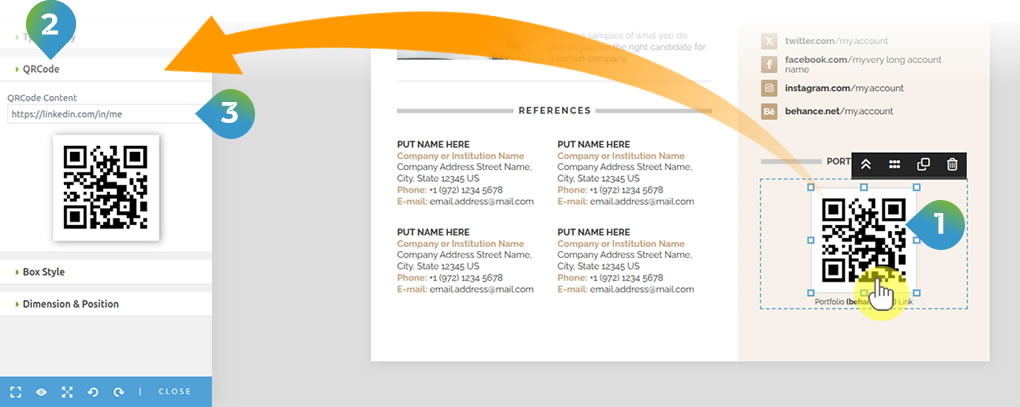
If necessary, change the text at the bottom of the QR Code, to match the contents of the QR Code created.
Tutorial Video:
4.2.5. Image Manager
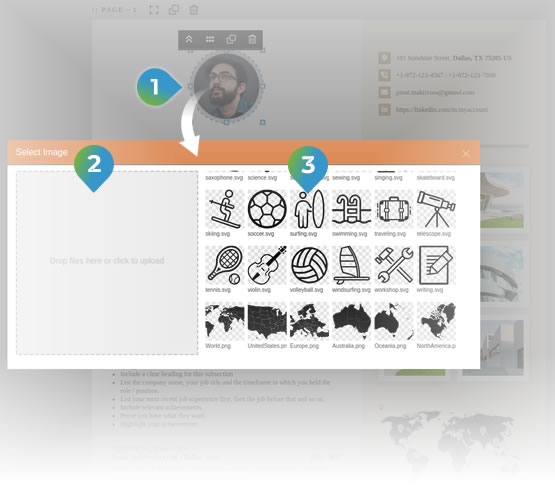
Image manager is one of the most used features in editing resumes and other documents on this App, especially on infographic resumes and portfolio documents. Elements that use the Image Manager feature to edit them:
- Profile Photo
- Portfolio Feature
- Map Feature (Back Image)
- Interest / Activities Feature
How to replace image elements?
To change the image on the features above, follow the steps below:
- Double click the 1 Image you want to change, the 'Select Image' page will appear (pop-up page).
- Select the image you want from the list of available images, if the image you want is not in the list, upload a new image by dragging and dropping the image into the 2 Upload box on the left side of the page or click the box to upload a new image from a folder on your computer. The new image will appear in the image list.
- Click the 3 New image you want from the list and your old image will be replaced with the new image you selected.
Tutorial Video:
4.2.6. Map Editor
The map feature can be used by users to show the locations of projects they have worked on, or the locations of companies the user has worked for before, etc.
Two elements that can be changed in this feature are: the map image in the background and the position of the pin on the map.

To change the position of the pin on the map, please follow the steps below:
- Select the 1 Map pin element to be repositioned, the map editor will appear in the tools panel.
- Change the vertical position of the pin by typing the vertical position value of the pin in the 2 'Up-Down' column, or by dragging the up-down button on the right side of the column.
- To change the horizontal position of the pin by typing the horizontal position value of the pin in the 3 'Left-Right' column, or by dragging the up-down button on the right side of the column.
To change the 4 map image in the background of the feature, it can be done through the Image Manager, as explained above.
Tutorial Video:
4.2.7. Portfolio Editor
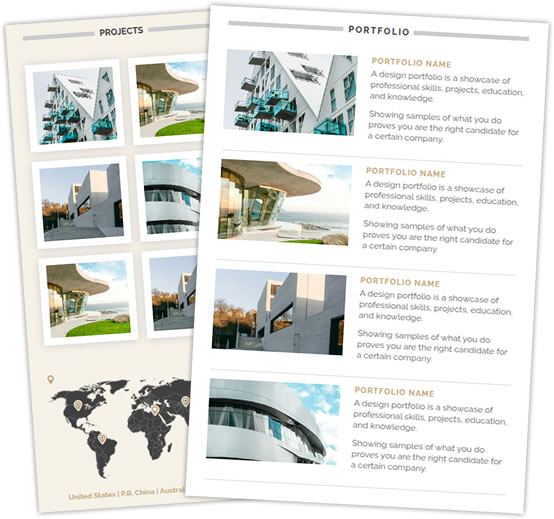
What and how to edit portfolio features:
Portfolio Editor is a tool used to edit portfolio documents or portfolio sections on resume documents.
By using this tool, users can add, delete or replace image elements in the portfolio feature, and can also change the size and shape of image elements in the portfolio.
This feature uses image editor tools (as explained in the image editor subsection above) to replace existing images with new ones.
There are 4 portfolio layouts that user can choose from the document template examples in this app and can be adjusted to user needs.
For more details, please watch Tutorial Video below:
A Quick Introduction - Image Manager
4.3. More Tools
In addition to the tools introduced above, there are several additional tools in the document editor that will greatly help users to customize the appearance of the documents they create, as well as several on-page tools that make the editing process easier.
On-page Editing Tools:
On-page editing tools in the image on the left, will only be found in the upper-left corner of the page on premium templates and but not in free templates.
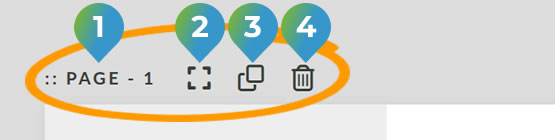
On the leftmost element of this Page Editing Tools you will find the 1 Page Number of the document,
and then the 2 'Select Whole Page' button on the right, which is useful for selecting the whole page as the element to be edited.
The function of the next button 3 'Clone This Page' button, is to duplicate the selected page,
so that it will increase the total number of pages in the edited document.
The last button 4 'Delete This Page', is a tool to delete the selected page.
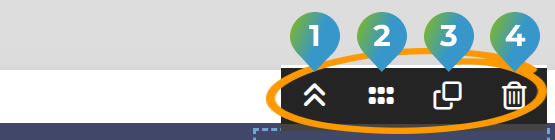
Every time you select an element on the edited document page, an On-page element editing tool as shown in the image on the left will appear.
The leftmost button, 1 'Goto Parent Element' is useful for switching to selecting the Parent Element of the currently selected element.
The second button 2 'Move Element' can be used by the user to move or change the position of the selected element, by dragging the element to a new position.
The third button 3 'Clone Element' and the fourth button 4 'Delete Element' as in the previous tools,
are for duplicating and deleting the selected element.
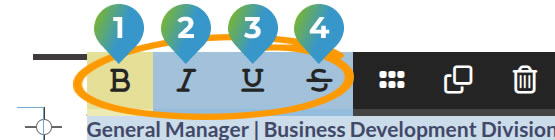
In addition to the element editing tools that appear when the user selects an element, when the user selects a 'text element',
On-page text editing tools will also appear (in edit mode, by double-clicking on the text element).
The user can select the entire text or part of the text to edit, and by clicking
the 1 'B' (Bold) button will bold the selected text,
the 2 'I' (Italic) button to add an italic effect,
the 3 'U' (Underline) button to add a line under the text and,
the 4 'S' (Strike-through) button to add a strikethrough effect to the selected letters.
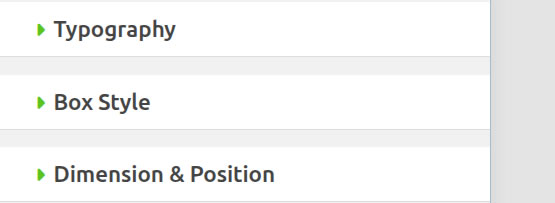
On the left panel you will find tools that are not related to only one particular feature. With the 1 Typography Tools,
users can adjust the appearance of all text elements, by adjusting the font size, font type, font color, font weight, letter spacing, line height and text alignment.
2 Box style tools, give users the ability to adjust the shape, background and border of all container elements.
The last tool is the 3 Dimension and Position Tools, which has features to adjust the Height and Width of all container elements,
as well as adjust the margins to other container elements, also adjust the width of the padding in the container element.
4.4. Public View Option
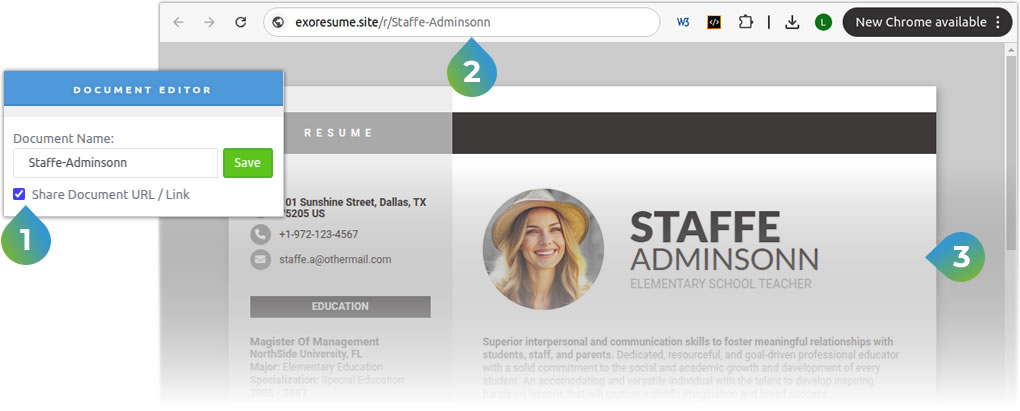
When you open a premium document to edit, you will find on the top left of the document editor, under the Document Name field, a radio button that gives you the option to share / or not share the document with the public via a URL Link. When you activate the 1 'Share Document URL / Link' radio button, the App will create a 2 Link that can be used by public to access the 3 Document via a browser. The link is created by the App by taking the name used by the document, without spaces.
Tutorial Video:
5. Resources
Below are links to several sources of information that you can use to get information and guidance on how to use this app.
User Guide
The first source of information on how to use this app is the ExoResume User Guide (This document), which provides detailed explanations and steps for using each feature. You can find every version of the user guide and its updates at: https://litescript.site/exoresume/tutorials.
Tutorial Videos

As a complement to the user guide above, users can learn in more detail for each feature available on the App,
as well as step-by-step tutorials on creating and editing documents through tutorial videos.
Users can access these tutorial videos through the 'Resources > Videos' menu or by visiting the ExoResume Youtube Channel:
https://www.youtube.com/channel/UCpjyNc0XRRq-GqjhoR1FERQ
Blog
To get the latest updates on features, improvements and new templates as well as other informations about the App, users can access the blog page via the 'Resources > From Our Blog' menu or via the '/blog' link in the browser.
FAQ
Frequently Asked Questions (FAQs) and answers on a particular topic.
Free Users only have access to Free Templates and Limited Basic Features.
You can still create documents using free templates. If the number of documents created is more than the maximum number of documents allowed for a free user, you cannot create another new documents.
Premium template based documents that cannot be accessed / edited are not deleted and will be accessible again after you renew the expired plan or subscribes to another Pro Plan.
Premium templates, come with all basic and premium features, such as: QR Code, Maps, Bar Chart, Pie Charts, Profile Pictures, Icon Manager, Portfolio Feature, Activities Feature. Premium Templates are also equipped with page cloning features, so users can freely add/reduce pages, and also have a Public View feature so user can share the URL link of the document with others to view the document via a browser. Premium Templates can only be accessed by users who subscribe to one of the Pro Plans.
Demo Template, has all the features like those in Premium Templates and can be accessed by Pro Users or Free Users. This template is only intended to provide Free Users with a quick access to all the Premium Features. All changes made on this template can be saved but cannot be printed, downloaded nor shared.
If the number of documents that have been created at that time is more than the number of documents allowed on the new plan, then the user will not be able to create any new documents. The user will only be able to create new documents, after the user deletes some of the documents that have been created, until the number of documents that have been created is less than the number of documents allowed on the new plan.
Source & Credits
Profile Images:
- Pixabay - https://pixabay.com/
- Unsplash - https://unsplash.com/
Map Images:
- SimpleMaps - https://simplemaps.com/resources/svg-maps/
Portfolio / Blog Images:
- Pixabay - https://pixabay.com/
- Unsplash - https://unsplash.com/
Fonts:
- Icons Font Face - https://fontawesome.com/
Scripts:
- Harnish Design - https://harnishdesign.net/
- jQuery - http://www.jquery.com/
- Bootstrap 4 - http://getbootstrap.com/
- Highlight Js - https://highlightjs.org/
- jQuery easing - http://gsgd.co.uk/sandbox/jquery/easing/
- Magnific Popup - http://dimsemenov.com/plugins/magnific-popup/
Support
Need help? We're here to assist you with any questions or issues you may have. You can find answers to common questions in our FAQ, browse this extensive knowledge base and videos, or reach out to our Item Support Page or send us Email at ExoResume Support Team
We are located in GMT +7 time zone and we answer all questions within 12 hours in weekdays (except holiday seasons which might take longer).
Changelog
See what's new added, changed, fixed, improved or updated in the latest versions.
For future updates, please check regularly in the 'Resources/Updates' menu on your Admin Dashboard.
Version 1.0.0 (June 2025)
Initial Release